Creating a View
What is a view?
A view is a virtual table derived from one or more tables in your database or data warehouse. Views act like tables within Loops, allowing you to interact with your data in a more convenient and meaningful way, and making it easier to perform analyses without modifying your original data. Views are also used to define data objects like KPIs, segments and features.
In Loops, you can create two kinds of views:
- "Existing table" – integrate a table or view from the data warehouse, as is
- "SQL query" – create a view from an SQL query, transforming the data as you wish
Since Loops integrates with your database or data warehouse, any new data that flows into your tables will be reflected in the views you create.
How to create a view
- Log into Loops and click “Data Management” in the left-side navigation bar.
- Click “Views” in the left-side menu.
-
Click the Create View button at the top-right corner of the screen, and a dialog box will appear.
- Enter a name and description for your view.
- Under “Based on…”, select what your view should be based on: “Existing table” or “SQL query”.
- If you select Existing table, you’ll then select a table or view from your database or data warehouse that your view will be based on (“Data warehouse table”).
- If you select SQL query, you’ll enter the query that will be used to generate the view.
- Configure the following parameters in accordance with your selection:
- For all table types:
- “Table type” – choose the type of table to create a view for:
- "Events" (a dimension table)
- "Entity properties" (a fact table)
- "State" (a table that holds aggregate data)
- “Entity type” - select the entity whose data is stored in the relevant table(s). For example: select “User” if the table stores user events or user properties, as opposed to account-level information.
- “Entity ID column” – indicate the name of the column in the relevant table(s) that contains the ID of each entity (e.g. User ID, Account_ID.)
- “Table type” – choose the type of table to create a view for:
- For Events tables only:
- “Event name column” – indicate the name of the column in the relevant table(s) that contains event names.
- “Event timestamp column” (for Events tables only) - select the column in the relevant table(s) that contains event timestamps.
- For State tables only:
- “Date column” - select the column in the relevant table(s) that contains aggregated dates.
- “Aggregation frequency” (for State tables only) – select whether aggregation for the relevant tables is performed on a daily, weekly or monthly basis.
- For all table types:
- Click Save and Loops will validate that the new view is valid.
- If valid, the view will be generated and appear on the “Views” page in Data Management. From there, you can edit the view or re-scan the original table.
- If it isn’t valid, an error message will appear.
An example
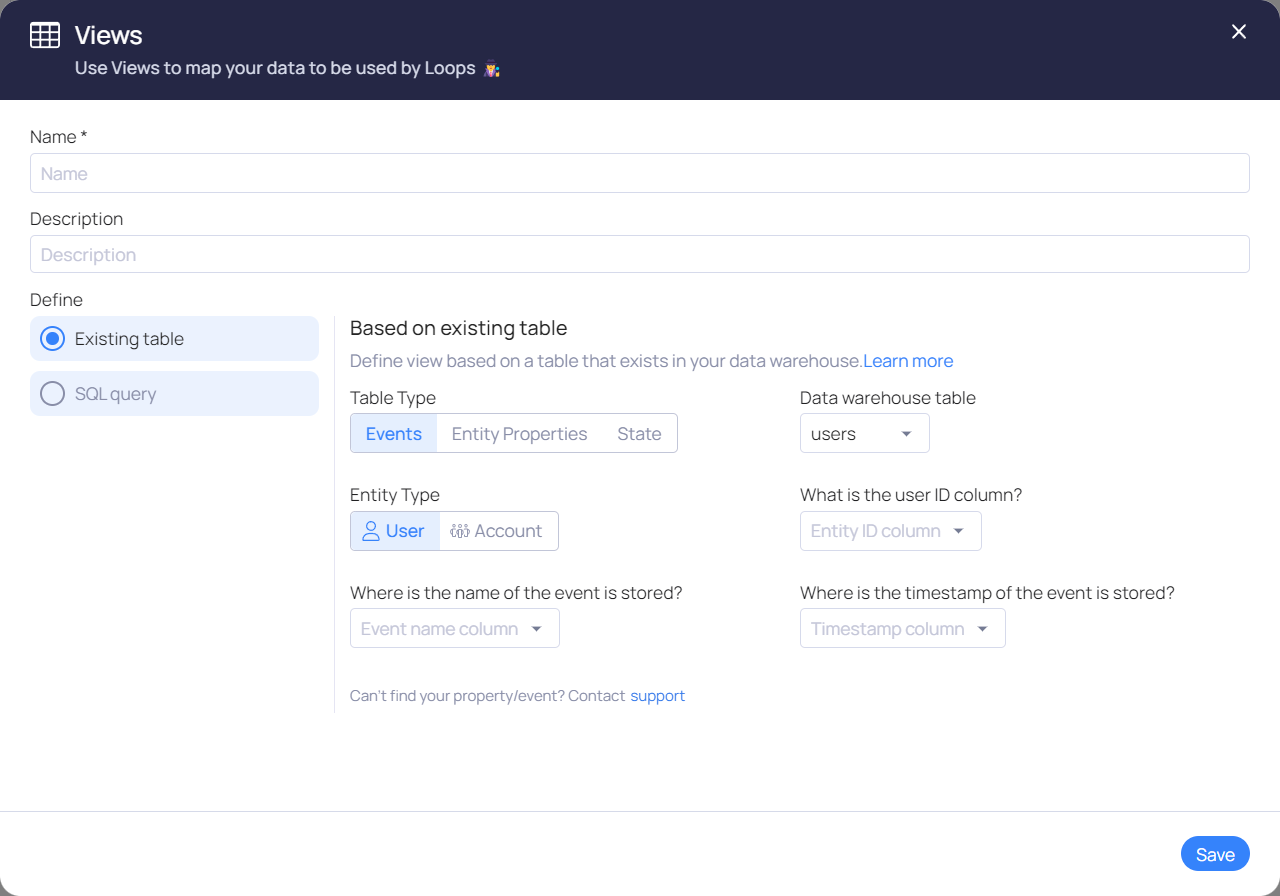
The below screenshot shows the selected parameters for a particular view:

As you can see...
- It is based on an Entity Property (Dimension) table named “users” with a basic query that filters test users.
- A column named “id” contains user IDs - this will be used to join with all other users related tables.